Factory manual / Early Access • V16.4 rules
Clear a scrap jam and turn the metal into ingots
Follow the scrap-jam banner to the marked machines and press E on each one to clear the trapped metal. Then fix the incoming route: send metal through a Smart Splitter’s Scrap door, or remove it with an upstream Scanner and aim its cannon at a Smelter or collection belt. Feed the Smelter two iron scrap or two copper scrap for one ingot. Generators burn scrap; they are not the same jam case as hay-processing machines.
Updated 2026-11-16 · Early Access • V16.4 rules
On this page
Follow the route
Clear the machines named by the warning
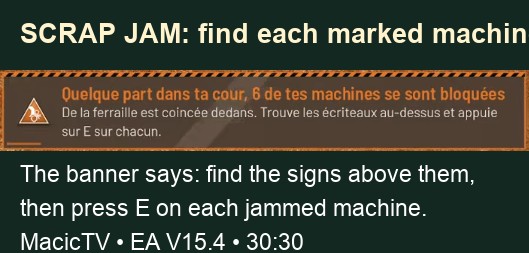
A scrap jam raises an orange warning banner and marks affected machines; a jammed machine glows orange up close or under your crosshair. Find the signs above the jammed machines and press E on each. Do not use the yellow lightning icon as a scrap diagnosis. After clearing, watch the machine accept hay and its output start moving again.
 Open full-size image ↗
MacicTV EA V15.4 at 30:30. The warning explicitly gives the E action for each jammed machine. Catch the next piece before it reaches processing
Keep a metal exit before the first hay machine. A Smart Splitter with a Scrap door separates mixed input; the V15.4 fix lets whole scrap heaps leave that door instead of stopping the conveyor. A percentage split merely divides material and does not guarantee that metal has been filtered out.
Aim a scanner’s metal at a useful destination
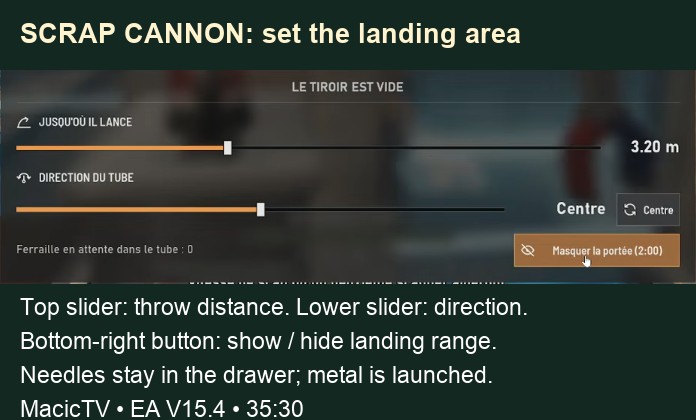
Aim at the Scanner and press E to open the drawer. Set throw distance and direction, and turn on the landing-range view. Put the Smelter or a collection belt at that landing area, then watch a metal load arrive. Keep it away from the hay intake and service aisle. V16.4 adds a Top View button on throwing machines; the pictured older interface shows the distance, direction and range controls.
 Open full-size image ↗
MacicTV EA V15.4 at 35:30. Needles remain in the drawer; the cannon launches metal. The shown 3.20 m is this setup, not a required distance. Build and supply the Smelter
Place a Smelter on the metal route, connect its power and give its ingots an outfeed belt. The V15.4 Smelter costs $200, draws 4 kW, and each additional Smelter costs 15% more. Keep iron and copper accounting separate: the recipe is two iron scrap or two copper scrap per ingot, not one of each.
Metal recovery on the V15.4 rules retained by V16.4 Input or condition Result 2 iron scrap 1 iron ingot 2 copper scrap 1 copper ingot Ingot sold within its full-price buyer allowance $30 base sale price No clear ingot outfeed The metal line can back up. Reserve useful output before flooding the stand
Send ingots to the parts line, a Depot or the Selling Stand. Buyer limits also apply to metal products, so selling too many of one product per minute lowers its price. Reserve what the active order or next build needs and give overflow a connected destination; loose scrap piled on the floor is not a reliable stock buffer.
Choose the jam setting deliberately
Options includes Scrap jams. Turning it off prevents metal from jamming hay machines, but scrap consumed by those machines is lost. Keep sorting if you want the metal. Do not diagnose a Hay Generator as a hay-processor scrap jam: the official rules say it burns scrap, and V16.4 fixes the wrong-load stop when a whole heap reaches its mouth.
Check limits when loose metal disappears
V16.4 has separate item-limit controls for products, metal, loose straw and belt loads, each with a live count. Check the metal limit and auto-cleaner before treating vanished floor scrap as a machine bug. Collected metal with a deliberate belt destination avoids depending on loose-item cleanup.
Completion check
Check the result
The orange jam clears, hay processing resumes, incoming metal reaches its own route and the powered Smelter produces ingots onto an unobstructed output.
If it still fails
If the next metal item jams the same processor, the sort is too late or a door is leaking. If metal misses the Smelter, re-open the scanner landing-range view and adjust its distance/direction. If the Smelter waits, check power, same-metal input pairs and its ingot outfeed before buying another.
Continue from here
Sources & version
Written for Early Access V16.4. Earlier gameplay images are labeled where used; diagrams explain connections, not exact building dimensions or measured throughput.