Factory manual / Early Access • V16.4 rules
Split finished output between selling, storage and orders
For finished products, place the final scanner before the destination split. Use a T or Y Splitter to branch a line and a Y or U Joiner to merge inputs. Use a Smart Splitter when different item types need different exits. For repeated selling/order changes, assign the destination splitters to named routes in the build menu’s ROUTES page; the game supports eight routes. The Split Ratio card adjusts one branch from 5% to 95% in 5% steps.
Updated 2026-11-16 · Early Access • V16.4 rules
On this page
Follow the route
Choose a branch, merge or item sort
A splitter divides an incoming stream; a joiner combines streams. The T Junction is the first splitter unlock. Compact parts are for tight layouts after Wire and Cores. Look for the in labels while placing compact pieces in V16.4 instead of assuming that a matching shape has the right direction.
Sort by the displayed door rule
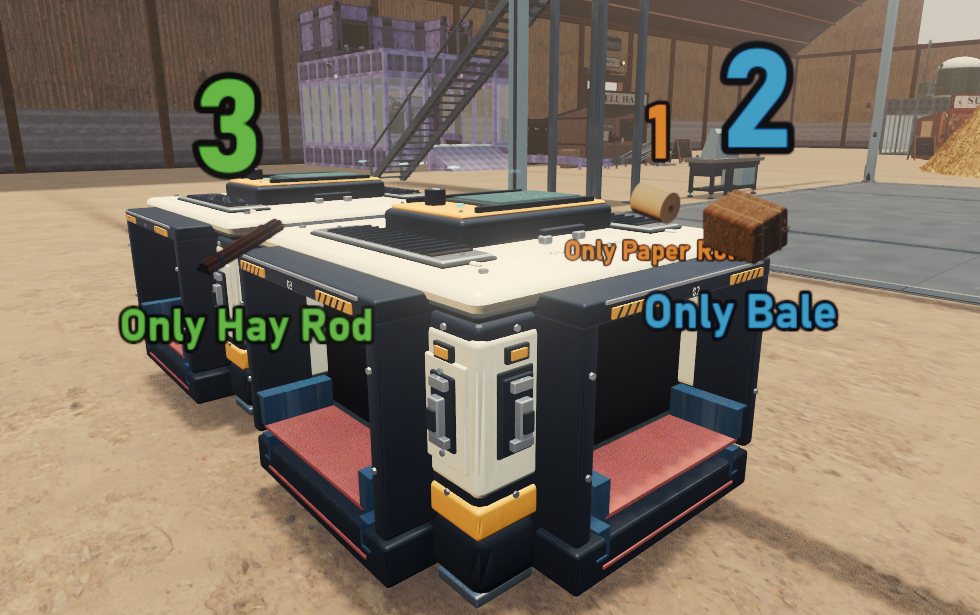
Open the Smart Splitter’s rules, choose the item type for the intended door and read the door number and item picture on the machine. Assign Scrap to the exit feeding metal collection or a Smelter, and keep hay processing on its own exit. The numbered example is an illustration of visible rules, not a preset that every machine uses.
 Open full-size image ↗
Official V16.4 update image. Read the rule under each door number; these sample assignments are not a universal metal-sorting preset. Keep the two kinds of split in their proper places
A source-side Scrap sort belongs before a hay machine it must protect. A finished-product destination split belongs after that product’s final scanner. These are different junctions: applying “scan then split” to all raw sorting would let metal reach processing; applying “split then scan” to final destinations could leave a needle bypass.
Set a ratio only for a shared supply
After unlocking Split Ratio, set the branch percentage on the splitter. Start with equal shares for two comparable lines, then watch the actual queues before changing it. A small Depot allocation can reserve stock while most output sells, but a ratio is not a guarantee of a target quantity or an order priority. The V16.4 range is 5%–95%, in 5% increments.
Create understandable route names
Open the build menu’s ROUTES page. Create a named, coloured route and put the relevant splitters into it, such as Panels to Truck. Put the selling destination into a separate route, such as Panels to Stand. You can switch a route ON or OFF from that page or a member splitter. Up to eight routes can be named.
Switch destinations without moving the junction
When you want the same output to serve one destination at a time, set the two routes to flip together: one opens when the other closes. Inspect the resulting belt flow at both exits. If a route must keep supplying generator fuel or critical water support, do not include its splitter in a general selling toggle.
Audit after every change
Follow goods through every door you opened. Confirm the metal exit reaches collection, the product exit still passes its final gate, and the receiving Depot or stand can accept the load. If two full input belts feed one joiner, a backlog can be an output-capacity issue; changing split ratios upstream does not create scanner capacity.
Completion check
Check the result
Each displayed door rule leads to the intended destination; named route switches change the expected branches, and every finished-product exit remains scanned.
If it still fails
If a branch stays empty, confirm its route is ON, the door rule matches the arriving item, and belt arrows point out of the splitter. If both inputs queue at a joiner, check the common outfeed. If metal reaches a hay machine, inspect the Scrap rule and its physical exit rather than changing a percentage.
Continue from here
Sources & version
Written for Early Access V16.4. Earlier gameplay images are labeled where used; diagrams explain connections, not exact building dimensions or measured throughput.